Wednesday 11 March 2020

"Guns. Lots of guns" - Taking Scyks to the Element Store Championships

Here's how I like to prepare for a tournament and get ready with my squad...
Two weeks out: I've picked the squad I want to play and I'm ready to get some practice games in and get good with it.
One week out: I didn't like that squad but now I've got two lists I definitely like and I just need to decide which of them I'm going to play.
Two days out: I've got five or six squads that I've never played before and I'm going to do ippy dippy or something to work out what to do. 
One day out: I'm just going to write "I am a fish" 400 times on my squad registration form then faint.

And somehow in among all these last minute changes I manage to do ok anyway.  In fact a lot of my best results in X-Wing have come from playing squads I'd never played before Round One of a tournament!  I don't recommend it for everyone, but it's just something I've become used to.

For the Element Games Store Championship this past week my usual attack of list indecisiveness was particularly acute.  Here are all the squads I genuinely considered and discarded at some point in the final 72 hours before the Store Championship...
  • Vader 6 TIES
  • Vader Duchess 4 TIES
  • Vader Duchess 3 TIES
  • Vader Maarek Duchess TIE
  • Vader Maarek Vermeil TIE
  • Vader Maarek Vermeil
  • Duchess 2 Strikers 4 TIEs
  • Duchess 2 Strikers 2 x1
  • Duchess 2 x1 3 TIEs
  • Duchess Maarek 4 TIEs
  • Duchess Vermeil 4 TIEs
  • 1 x1, 3 Striker, 3 TIEs
  • Leia Luke
  • Leia Luke Jake
  • Leia Luke Arvel
  • Leia Luke Jek
  • Leia Luke Thane
  • 2 Fang 2 Ion 2 Tractor
  • Laetin, Ahhav 3 Ion 2 TIE
  • 5 Ion Scyks, 2 TIE
  • Holo Scorch Rivas TN  2 TIE
  • Holo LeHuse Scorch Rivas TN
  • Kylo Scorch Rivas TN Epsilon
  • 4 JK Ahsoka
  • 4 JK Broadside
  • 4 JK Barriss
  • Obi Plo Ric ARC
  • Ani-Y Obi Plo
  • Cova, Jess, Bastian, Red Sqd
  • Kaz, Rose, Tallie, Bastian, Red Sqd
  • Poe, Kaz, Zizi
So what did I play?

None of the above...


Guns.  Lots of guns.
  • Cartel Spacer (M3A Scyk) - Tractor Beam
  • Cartel Spacer (M3A Scyk) - Ion Cannon
  • Cartel Spacer (M3A Scyk) - Ion Cannon 
  • Cartel Spacer (M3A Scyk) - Ion Cannon 
  • Cartel Spacer (M3A Scyk) - Autoblasters
  • Cartel Spacer (M3A Scyk) - Autoblasters
  • Mining Guild Sentry (Mining TIE) 
    (199pts)

I invented that on Friday evening after one game my Laetin and Ahhav version of the Scum swarm proved to me that I didn't want multiple Initiative levels in the squad as it made movement order too complex and limited my options.


I'd never played Autoblasters before.  In fact, I'll go further: I had a pretty strong opinion that they were rubbish based on my understanding of X-Wing theory and headsim.  But everyone said that they were good... so give them a try?  I didn't really have another plan so let's go for this and borrow some more Scyks to finish the squad off.


Although I'd never played *this* squad before it was very similar to my old Scyk swarm with the two Fang Fighters in that I'd taken to the System Open.  Unfortunately I'd come away from Milton Keynes increasingly sure that I couldn't continue to play the Fang Fighters.  Until Fangs get into Range One and use Concordia Faceoff they're vulnerable and not particularly cost-efficient, but against Firesprays it's difficult to force range one as the opponent can control range so well with Slave I title and boost actions.  When you do get range one it might be in their rear arc so Concordia isn't on anyway.  You stress yourself a lot which Koshka loves, and loads of Proton Bombs being dropped is upsetting to ships with no shields too.

I hadn't been scared of the stripped-down Boba Fetts that I expected before Milton Keynes as they were all trying to outbid each other, and Fenn was so bad against all my arcs and control effects.  But the loaded up Boba Fetts with bombs and Fearless and Contraband were much more dangerous and Koshka Frost was a much more troublesome wingman than Fenn.


The Scyks choice was grounded in pure efficiency and maths.  In First Edition you could field this squad pretty much unchanged, just Autoblasters were different in 1.0.  You *could* field this squad... but it would cost 128 of your 100 squad points.  The raw efficiency I get in the new points values is crazy - it's basically two free ships!  In theory I could just wade into any fight and expect to come out ahead unless variance swung WAAAAYYYY against me, and that was the strategic call I decided to make.

I was going to back my maths.  Back my spreadsheets.  Back my conviction that cannon Scyks are the most cost-effective ship that has ever been in either edition of X-Wing.  

Money.  Mouth.  Same location.  Let's go.


ELEMENT GAMES STORE CHAMPIONSHIP

ROUND ONE - Darren Grainger
Boba Fett, Koshka Frost

This was not a nice easy start to the day.  The last time I saw Darren he was running deep into the top cut in the System Open at Milton Keynes with his quad Jumpmasters and four large bases would be a real chore for me to chew through.

Good news: Darren wasn't playing quad Jumpmasters

Bad news: Darren is playing Boba-Koshka instead

I was really happy with the deployment and engagement despite managing to bump myself by tiny margins a couple of times.  My guys converged on Koshka as she screamed down my right hand flank, forcing her to run wide away from my arcs and into my deployment zone as she rounded a big rock that was on that corner of the table.  Koshka was about to become intimately familiar with that asteroid.

Kosha: meet rock.  Rock: meet Koshka.
I tractor beamed Koshka onto the asteroid (no damage from the asteroid roll) then double ionised her.  The next turn I bump a ship into the front of her so she stayed sitting on the rock (no damage) then tractored her again, dragging her across the rock (no damage), then ionised her again and bumped another ship into the front of her so that she spent a third turn pinned onto the rock (no damage again).  She had a console fire this whole time (yep: no damage).  I plowed my Autoblaster Scyks in and unloaded, she dodged it all and finally limped away living on her Hull Upgrade after avoiding 7 ~50% chances of taking a damage from the rock and Console Fire.

Why are you not dead yet, Koshka?!?
It was decisive.  While I was giving Koshka the lions share of my attention for those three turns Boba had swept in behind and started shooting my Scyks.  They were doing Scyk-y things and refusing to die but they were pretty much all smoking and in trouble... then on the final turn 3 or 4 of them exploded at once in a hail of unavoidable bombs and gunfire and I loston MOV.

It took probably two turns longer for Koshka to die than it really should have done.  Had I got to 6-on-1 vs Boba earlier the outcome could well have been different.

Still, it was a lot of fun just grabbing Koshka by the hair and scraping her up and down that asteroid for a while!

LOSS
89-154


ROUND TWO - Jess Rushworth
Vader, Feroph, 2x Tempest Squadron

Jess was flying precisely the sort of jousting squad that my Scyk's should mathematically be able to just chew through more quickly than she could bite back.  The main risk I had was that the TIE Advanced's crits could be a real wildcard and a couple of unexpected Direct Hits could quickly tip the tradeoff maths back in Jess' favour.


I stalled my approach and let Jess come down my left hand flank, then went on the attack as she get my side of the table.  The way we'd engaged at a 45 degree to each other made it difficult for either of us to focus fire on a single target and the combat was really indecisive and started to get very messy as we just turned the corner of the table into a carpark.

Fortunately that worked out mostly in my favour and Jess' TIE Advanced struggled to get clear enough to get actions and set target locks.  The Death Troopers on Jess' Reaper were a bit of a chore as I tried to clear stress from my K-turns but ultimately my Scyks just did what they're supposed to do and traded consistently ahead the whole way.

It was a gruelling slug fest but one that I just inexorably inched further ahead in with each passing combat phase and I took the win.

WIN
200-115


ROUND THREE - Ben Hibbert
Boba Fett, Nom Lum, Genesis Red

I last met Ben when we played a mirror match with my original Sick Scyks last month and we'd both moved on from that squad but in different ways.  I was now doubled-down on Scyks while Ben had picked up Boba Fett and Nom Lum, with Genesis Red carting some Proton Torpedoes in for extra punch.

The early game rapidly went my way as my swarm surrounded Nom Lum like a shoal of piranha and just shredded the Jumpmaster in short order.  Ben had decided to delay lunging in for a block early and gave me a range 3 engage but then my Ion cannons removed Nom Lum's options and next turn the Jumpmaster just idled
forwards into a deadly killbox when Ben would have been looking for a 3 bank and bump. Genesis Red flung his first Proton Torpedo but then got caught up in the feeding frenzy around Nom Lum's ionised carcass and couldn't get away.

That left me with almost my whole squad available to move on and surround Boba Fett.  Ben did his best to scrap his way out of the fight but his cheaper Boba Fett - no Fearless, no Proton Bombs - didn't have the tools to keep my little ships at bay long enough.


Boba extracted his pound of flesh and a couple of kills as I hounded him across the table but the pressure was relentless and the Firespray could only take so much.

WIN
200-88


ROUND FOUR - Matt Farr
Fenn Rau, 3x Zealous Recruit

Four Fangs, even if one of the was Fenn Rau, was a matchup that I was pretty confident would go my way.  My range of cannons is almost custom-built to threaten all these low-health targets that simply can't risk getting a tractor beam or ion token assigned to them.

And I did win, but it was a bit tougher than I expected.  Matt broke Fenn off to threaten to flank with Outmaneuver while the Zealous Recruits came straight down the middle of the table.  I split my forces a little, leaving a couple of Scyks on Fenn to keep him from turning my flank too easily while the rest laid into the Zealous Recruits.  The first engagement went my way as I ionised one of the Fangs but then on the next turn Matt made a couple of nice little decisions that re-opened the door for him.

Matt had lined up his Fangs in a 'box with a gap' formation, two Fangs at the front with one Fang sitting behind the left Fang as I saw it.  That left a really attractive gap on the table behind the right-side Fang for one of my Spacers to throw a big 5K into and get behind his formation after the first engage.  But Matt had spotted that play and barrel-rolled his back Fang across into the gap, blocking my K-turn and leaving that Scyk out of the fight for much of the game.

It all got very clumsy in the middle of the table and I had to switch targets from the wounded Fang to shoot at targets of opportunity that wouldn't have Concordia Faceoff working for them at range 1.

The Skulls part of the table had become a proper mess.

The Fenn side of the table was still going my way, though.  After pushing Fenn out wide I sent an Ion Scyk after him with an Autoblaster Scyk following up and finally got my first unpreventable Critical Hit of the day from Autoblasters!  It was Damaged Sensor Array that really hampered Fenn's ability to sweep around the flank, then two turns later Fenn also ate an unpreventable Structural Damage.


It hadn't gone as cleanly as I'd hoped but the raw grinding power of the Scyks pulled through once again.  I finally got away from Concordia Faceoff and removed two of the Zealous Recruits and Matt decided that Fenn's Structural Damage meant he had to fight his way out rather than try to run and flank.  Fenn darted in and deleted a Scyk in one shot but it was his last involvement and I took him off bext time.  It was time for my remaining Scyks to mop up the last Fang.

WIN
200-115


ROUND FIVE - Jason Denton
Ric Olie, Anakin Skywalker, Ahsoka Tano

Last time I was at Element, for the Sith Taker Open, it was Jason who handed me my first round defeat with the Sloane Swarm.  Would I get my revenge with the Scyk Swarm today?

Jason was flying a very unusual but potent alpha-striking Republic list.  It featured both Ric Olie and Anakin Skywalker in N1 Naboo Starfighters with R2 astromech regen, Outmaneuver and Proton Torpedoes.  Either of those ships could easily light up a Scyk!  Running behind the two N1s was Ahsoka Tano to give Ric some extra punch.
Pros: he's got a low ship count, Tractor Beams and Ion Cannons are really good.
Cons: OMG Outmaneuver Proton Torpedoes will delete my Scyks very quickly!  I also have to be really aware of the danger of half-killing one of these ships and letting it get away to repair and regenerate.
I was very wary in approaching this list as it would be so easy for me to overcommit and hand Jason a flank to exploit with Outmaneuver.  For a couple of turns I feinted this way then that way before committing most of my forces towards Ric's flank.  With Anakin and Ahsoka in his team Jason had complete control of when the engage would happen and he decided to strike relatively early, pushing Ric forwards with a banked boost thanks to Ahsoka's pilot ability then hurling a 5 forwards to launch his Proton Torpedoes from both ships.

I forgot to take any photos of this game!
My Scyks managed to tank both shots pretty well.  I lost a shield to Anakin's Proton Torpedo and took a crit on another Scyk from Ric.  In return my cannons opened up and Ric was immediately in trouble - tractored forwards and eating damage from several ships even if he managed to avoid getting ionised.

I simply couldn't let Ric escape to regenerate so after a bit of consideration I decided to hand Anakin my flank and go all-in on blocking and killboxing everything Ric could conceivably do to get away - block the 5 forwards, block the 3 bank, block the 3 turn... the only move I didn't block was the one that Jason actually did, which was a 3 turn AWAY from my ships towards the board edge.  That allowed Ric a turn's grace but also sealed his fate - there was only one way out of that corner of the table and my Scyks were waiting for Ric when he reappeared from the corner on the next turn.

Ric running from my Scyks.  Artist's impression.
Ric was down and Ahsoka swiftly followed, surrounded and hounded by a swarm of Scyks and nasty cannons.  Anakin had largely been given free rein behind my team but with his second Proton Torpedo spent and his wingmates dead the little Naboo Starfighter was minimal threat.  Rather than spend the next half hour trying to run away and scrape MOV at the end of a long day Jason graciously called it quits and gave me the win.

WIN
200-73


WRAPPING UP

I finished on 4-1 in 5th place, missing the cut on MOV but picking up a decent amount of the nice First Order alt arts and cardboard punchouts.  Sometimes sitting just outside the cut is the cause of bitter disappointment but the way that my day had gone, eating my loss and worst MOV win in rounds 1 & 2, meant that I had never expected to make the cut to begin with.

After round 2 I hated this squad.  Hated the stupid autoblasters and their stupid range 2.  Hated not having Fang Fighters to whizz about with.

After round 5 I liked the squad a lot more.  It's so dependably better than almost any other squad you meet so long as you can keep rolling dice.  In a lot of ways it's dull as dishwater as you never do anything but set dials and take Focus actions (at least with the Fangs in the old version you were boosting and blocking and things) but in other ways planning the killboxes and managing to create unavoidable traps and overlapping fields of fire was engaging enough.  I'd happily play this squad again, though I may tinker with it slightly.


The only decision that really remains to be made is on the specific cannon mix:
Tractor Beams:  They’re really good vs 3/4 ship ace lists.  The most dangerous gun you’ve got as a single red dice squeezing through can be disastrous.  But against other things they get weaker very rapidly.  It’s a meta call if you want 2 of them but in a Boba-heavy world 1 is fine.  Best R3 threat. 
Autoblasters: like a bad CLT but you do occasionally get uncounterable crits in which is nice.  It’s weak but probably does enough it’s not wasted points.  Bigger issue is playstyle which means they don’t work well for my desire to hold longer range area coverage arcs like I'm used to with Tractor Beams and Ion Cannons.  YMMV. 
Ion Cannons: just great vs almost anything.  Too many of them does become counterproductive, though, as you don’t deal big damage just unnecessary extra ion tokens.  Solid at all ranges.

All things considered, I guess I need to go and order myself another couple of Scyk models after all!
Tuesday 3 March 2020

Generic Efficiency Revisited - new points, new ships, new stats!

You can often track the things I'm thinking about and planning through the blogs that I write and one of the most influential blogs on my thinking was Rule #32 - Enjoy The Little Things which I wrote back at the very start of November.

If you missed that blog it was essentially a response to how often players seemed to be surprised by perfectly good ships doing well in tournaments just because they were cheap generics not glamorous aces with loads of upgrade cards.  Here I'm thinking about things like the Bandit Squadron Pilot that was in the World Championships Final, or the TIE/fos and TIE/sfs that had begun a First Order resurgence at the end of last year and almost won the Polish national championships under the expert piloting of Maciej Paraszczak.

When you bring Epsilon Squadron Cadets to fight Boba/Fenn
It's an article that a few people have spoken to me about in how it changed their thinking, and it certainly had a big impact on me pretty much from the moment I finished writing it.  I switched almost immediately into flying First Order for December, then a discussion with Green Dragoon about why the TIE/fo was so good and the Scyk was so forgotten ultimately became the Hyperspace squad that I played at the Milton Keynes system open.  And it's likely that if I hadn't been looking at this space I'd never have thought to play my Sloane Swarm and grab my ticket to Worlds!

Not a bad payoff for one blog, eh?

A fair bit has changed since early December.  We've got new points for a lot of stuff, especially the lower end generics, we've got two new ships to evaluate.  We've also seen the game swing quickly towards higher ship counts and lots more generics and I've been busy working out a different way of looking at generic efficiency for a more rounded view.  So let's dust off my excel tables and have a second look at the subject.


Generic Efficiency II: Judgement Day

In my original blog I spent the whole time looking at the unloved little nippers that only have a 2 dice primary attack, like TIE Fighters, Torrents and Z-95 Headhunters.  I benchmarked their ability to survive incoming attacks long enough to return fire against the basic Academy Pilot TIE Fighter, long held as a fundamental building block of X-Wing maths.

In this revisit I'm going to widen that view out to include a lot of the most common 3 dice primary ships like TIE Strikers, B-Wings, ARCs and so forth.  I'm going to benchmark their survival efficiency against the humble T-65 X-Wings for much the same reason that I used the TIE Fighter for the 2 dice ships.

I've also now added another type of statistic that looks how many hits on red dice the ships will roll per point spent, which allows you to compare the 2 dice and 3 dice ships against each other to some degree.

Here are the 2-dice primary ships, benchmarked against an Academy Pilot TIE Fighter...

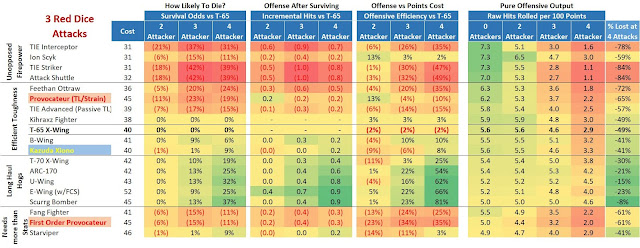
And here are the 3-dice primary ships, benchmarked against a T-65 X-Wing...


How To Read This Table

My original blog explains a bit of a step-by-step of how I arrived at these tables so if you feel like you just had a numbers fruit salad thrown at your face you may want to go and read that first blog.
If not, let's pick a ship and follow it across the table and see what we learn.  Let's take the generic TIE/sf.

The TIE/sf costs 32pts for a Zeta Squadron Survivor, and to be honest a lot of the time you see it flown exactly as that, just 32pts for a naked ship.

Going from left to right, the first set of stats compares the TIE/sf's likelhood to explode if it gets shot at by multiple 3 focused red dice, and compares it to a TIE Fighter.  With it's extra hull points the TIE/sf is a tougher target to kill than a basic TIE Fighter, 21% less likely to die to 2 attacks (because the TIE is quite likely to survive too), 37% less likely to die to 3 attacks (which are pretty likely to kill the TIE Fighter) then 31% less likely to die to 4 attacks (that lower Agility value starts to catch up as more attacks rain in).

That increased likelihood translates into the TIE/sf being likely to roll more hits than a TIE Fighter once it starts taking damage: first of all because it's more likely to still be on the table, and secondly it's more likely to have kept hold of its focus token in the process.

That all makes the TIE/sf sound like a much better ship than a TIE Fighter... and it is!  But it also costs a lot more points.  The third table reflects that and says that even though the TIE/sf is rolling 0.4 more hits than a TIE Fighter after being shot at by 2 attackers that's a smaller increase in damage output than it was an increase in points cost, so the TIE/sf is actually a less cost-efficient if it's shot at by 2 ships.  That flips to the TIE/sf being more cost efficient as more attackers pile in and the /sf remains on the table longer.
NOTE: this is basically where my original blog stopped.  At this point you've highlighted the ships that were tougher than you thought, which meant they lived longer than you thought, and dealt more damage than you thought.  This time we're going further, though.
The final section of the table, on the far right, show's the raw damage output PER 100 POINTS SPENT*, which is an important new measure I've added for this revisit.  What it shows clearly is that the TIE/sf is actually a pretty mediocre source of damage output when nobody is shooting at it - it deals no more damage than a TIE Fighter would and costs nearly 50% more!  But it also shows that the TIE/sf starts to shine once it gets stuck into the fight and survives a lot longer than the TIE Fighter would, losing only 49% of it's damage output after its been shot at by 4 ships while the basic TIE would lose 78%.

*the only reason it's 'per 100 pts spent' not 'per point spent' is that it turns into nice full numbers instead of tiny decimals.


You: "Cut to the chase.  What does all this tell me?"

When you take a TIE/sf in your squad you're not looking to maximise the initial damage output of your squad - if you were you'd take TIE/fo's as they're much more cost-effective at rolling hits (4.7 hits per 100 points vs 6.0 for the TIE/fo if you've not had to defend yourself). 

You're not even putting TIE/sf's in because they're tougher and will last longer under fire, as even vs 3 or 4 incoming shots the TIE/sf is no more cost-effective at rolling hits than the TIE/fo is (2.4 after 4 attacks vs 2.4 for the TIE/fo). 

You need a different reason for taking a TIE/sf - that you plan on making strategic use of the ship's other abilities like it's rear arc to leverage having more shots on target, or by keeping your dice mods when the TIE/fo would stress itself to k-turn.

And now you know what the ship is for.  You know what you need to do in order to get value from the points you're spending... and you also know that if you're not doing those things reliably then you should probably be taking a TIE/fo instead!


Round Pegs for Round Holes

That runthrough of the statistical strengths and weaknesses of a TIE/sf can be repeated for any ship in the table, and if your favourite ship isn't there then Punkuser's wonderful X-Wing calculator will help you work it all out for yourself.

But to save you some of that effort I'd go so far as to say we can see that there are some pretty clear strata in performance that we can fit ships into - roles that we can see they're mathematically better at performing than their competitors.  Once you understand these roles, and why each ship is naturally better at performing a certain role rather than another, you can really start to pick the right tool for the job, and to use your tools in the right way.


Unopposed Firepower
eg. Vulture Droids, TIE Fighters, TIE Strikers, Z-95 Headhunters

The ships in this bracket shine at cost-effectively putting as many red dice onto the table as possible.  Generally speaking these ships are very weak and vulnerable and will see their offensive output deteriorate rapidly once they start taking shots, but if you can avoid that happening somehow they really shine at pure offense.  How do you stop them being shot at?  Maybe you just bring lots and lots of them (the Vulture Swarm approach), maybe you have other things that the opponent has to pay more attention to (the Soontir/Vader and a few TIE Fighters approach).  But make that happen somehow and you're right at the bleeding edge of sheer firepower than you're going to hurl at the opponent.


Efficient Toughness
eg. Torrents, TIE/fos, T-65 X-Wings, B-Wings

These ships are probably the ones that my last blog really shone a spotlight on - the little guys that everyone was ignoring but which were far harder to kill than their points cost really deserved - you can hurl 120pts of T-65 X-Wings at a 25pt TIE/fo and still only have a 28% chance of killing it!  These ships tend to be a step below the real peaks of pure damage output that the Unopposed Firepower boys are capable of, but they're able to deliver that damage output more reliably in the face of enemy action instead of folding up like a paper plane at the first sign of blaster fire.

In truth there's a real sliding scale in this bracket, particularly in the ships with 3 red dice.  At the cheapest end the Feethan Ottraw Autopilot in his Belbullab fighter is a real hybrid of Unopposed Firepower - as close to a TIE Striker as he is to a B-Wing.  At the other end of the scale the more expensive and durable options like a B-Wing are so good at holding onto Focus for their dice mods that they are starting to head towards the next bracket of Long Haul Hogs


In general, though, I think the Efficient Toughness guys are really having their moment in the spotlight right now.  The way points costs have come down on a lot of these ships means they're a pretty efficient source of damage output, and unlike the Unopposed Firepower guys you're not quite so close to watching the whole thing fall apart at the first sign of bad variance because they're almost always going to take that little bit longer to kill than either you or your opponent really expect for their cost.


Long Haul Hogs
eg. ARC-170, T-70, Scurrg Bomber, U-Wing

To my mind there are two defining characteristics of the Long Haul Hog category of ship: first of all they're not actually all that good at dealing hits per point spent so you're not a particularly big offensive threat, secondly they're usually big fat ships with lots of hull & shields that don't really care about incoming fire and can keep pouring out damage regardless (often because they only have 1 Agility so spending it on defense doesn't do much).  These ships aren't about trying to remove opponents with a mass of initial damage, they're about keeping that threat on the table not just through the first engagement but on into the next turn, and the turn after that.


You don't often see squads relying solely on these types of ships, though.  Often (though not always) that much toughness and hull tends to mean the ships have more limited maneuver dials or reposition actions.  They also tend to be expensive enough that you can't really mass many of them in one place.  That doesn't make them bad ships, though, and they're often used as a dependable source of damage output for a squad that wants to really not have to worry about keeping a chunk of the squad alive for a while.  Target priority in your squad can make a real difference to how useful these big hogs are - often they'll be so annoying for your opponent to try and kill that they'll be left alone entirely!  That may be good if you're hoping to bait people into chasing something else, or may be bad if you were hoping to bring something to take the heat off a more fragile ace!


Needs More Than Stats
eg. RZ-2 A-Wing, TIE/sf, Fang Fighter, Starviper

This final group is really where 'everything else' sits.  These are ships where the raw statline, damage output, resilience to incoming fire etc just isn't best-in-class quality in any area really.  So does that make them bad ships?  No, it just highlights that there's more to ships than stats and you're taking them for some other benefits they might have.  It could be rear arcs, linked actions, awesome ship abilities, great maneuver dials, bendy barrel rolls... all that good stuff that just crunching numbers through a machine will tend to ignore.

Being able to fire backwards has its advantages...
But it also means that you should be aware that you're taking these ships FOR that extra ability.  Take a squad of Starvipers and joust with them... you probably should have taken a Kihraxz Fighter instead and saved some points.  Try to maximise your Howlrunner damage with some Inquisitors and their Force token... you probably should have taken Academy Pilots instead.  If you've not got a plan for how the unique abilities of these ships are going to give you an advantage on the table then their raw efficiency and statline is going to be a step or two off the pace.


Size Matters... Quite A Bit

Yoda was talking shit when he said size didn't matter.  But then the little dude was like 2 foot nothing so he was hardly going to come out with anything else was he?  When it comes to X-Wing maths size definitely does matter, and in particular the size of the incoming shots matters a great deal. 


All through my original blog and the efficiency tables above I've talked about how damage and cost-effectiveness changes as you come under increasing enemy fire.  All those incoming shots are single-modded 3 red dice attacks at range 2, but if you change that basic assumption it can have a big effect on what ships do best.

In particular I think there's a bit of a feedback loop in play at present: all the points reductions to ships like TIE/fo and Scyks, and low starting costs on Vultures, Torrents and Fireballs, mean that more than ever we see players fielding masses of 2 red dice primary ships.  And when you change the assumption of incoming fire from 3 dice attacks and 2 dice attacks you start to skew the results towards higher Agility ships doing better.


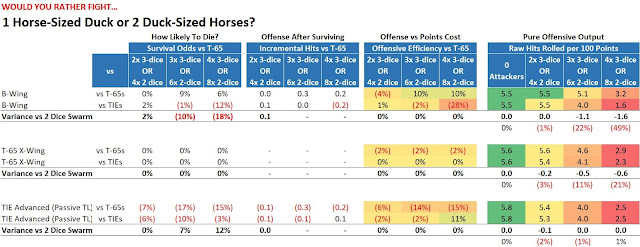
I'm not going to restate the whole table again for 2 dice ships because it's kind of repetitive, but this example really shows you how much it can change.  When you flip 4 incoming 3-dice attacks (say, 4x T-70 X-Wings) to double the number of incoming 2-dice attacks (8x TIE/fo; the "FOcho") it has a big impact on how well 1 agility ships like a B-Wing manage to repel that many incoming dice and they ultimately lose about 50% of their expected damage output.  A 2 agility ship like a T-65 will lose about 20% of its damage output, while a 3 agility ship like a TIE Advanced x1 basically works out exactly the same as it was vs 3 dice attacks.

Depending on the metagame you expect to play in the decision between two ships may be best being steered by whether you need that 3rd agility or not.  I'm certainly steering towards TIE/fo ships over TIE/sf at the moment for that very reason.


Special Snowflakes

As well as calling out a few big segments within the table I also want to take the opportunity to talk a bit about a few particular ships and results that caught my eye.

TIE Advanced x1

Let's start here, seeing as we've just spoken about how well the 3 agility chassis stands up as the metagame swings towards facing the likes of TIE/fos and M3-A Scyks.  The Sith Taker's Tim King sealed his Worlds invitation at Milton Keynes flying five TIE Advanced x1 and to be perfectly honest until I reran all my numbers for this article I kind of felt like he must have fluked it somehow.  I know a lot of players feel the same way - you go without defensive tokens to take a Target Lock for their Advanced Targeting Computer so surely they just die? 

Well actually they die a lot less often than you'd expect, and that's particularly true if you can range control to a R3 engagement or are fighting against 2 red dice ships.  Played the right way, or against the right things, and the TIE Advanced can match our outperform a T-65 even despite having to take it's Target Lock actions.  And that's before you get onto the benefit of all those tasty crits...


Fireballs

The new Resistance racer, the Fireball, is costed very attractively in two configurations.  The generic Colossus Station Mechanic is only one point more than a V-19 Torrent at 26pts and has a better dial and the awesome SLAM mechanic.  I know Ryan Farmer of the Fly Better Podcast has already won with them and this table suggests it's not a fluke - they're really good cost-effective ships.  But you've also got Kazuda Xiono and if you assume that he gets his pilot ability active he's a very efficient equivalent to a T-70 X-Wing.  In many ways Kaz is the best E-Wing pilot in the game with his 3/3/6/0 statline at 40pts, and he still gets to SLAM around and Initiative 4 into the bargain!


First Order Provocateur
I'm no fan of the TIE/ba at all and I think you can see why when you look at where the Provocateur sits in the table - way down in 'needs more than stats' with a lowly level of damage output for its point cost combined with losing what firepower it does have very rapidly as it has to spend Focus to stay alive under fire. 


And yet... if you decide to switch modes and hurl the TIE/ba in for more firepower, taking a Target Lock and Strain token with the ship's ability... it's actually not as bad as you'd expect.  That's the version of the TIE/ba that's sitting up in the Efficient Toughness section, almost like the Feethan Ottraw Autopilot as a hybrid into Unopposed Firepower.  If you're allowed to use your Target Lock and Focus to attack you're an efficient source of hits, even at 45pts, and even if the enemy decides to shoot at your Strain token the TIE/ba doesn't die quite as easily as you'd expect and if you can stick around thanks to your Focus token you've still got your Target Lock on hand to exact revenge.

I still don't love the TIE/ba, but I thought the Strain token was going to hurt a lot more than it actually does when you math things through.  Particularly if you have something else worth firing at more I think the First Order Provocateur can deal some real damage.


Ion Scyks
Oh lordy I love the Ion Scyks.  I loved them already which is why they were my squad going into the Milton Keynes System Open.  My original blog created some discussions about why nobody was using Scyks if I thought the TIE/fo was so good, and what we hashed out was basically the perfect scenario you'd want to see to justify playing the Scyks... and thanks to the January points changes that scenario is exactly what came true!


Ion Scyks stand out on this table as having the best of both worlds available to them - they deal out hits-per-point about as effectively as the best of the Unopposed Firepower ships like Vulture Droids, but they are also able to defend themselves from incoming fire much better and retain that output despite coming under pressure.  Yes not all those red dice are dealing damage but Ion tokens are usually an acceptable replacement for damage cards, and in my experience it's rare to be over-ioning something, the Ion Cannon is usually just a much better chance of dealing 1 damage through their green dice. 

Yeah.  I love Ion Scyks.  You should love Ion Scyks too.


In fact, in general maybe you should learn to appreciate the little things too.  These days they're capable of surprising even the best pilots in the galaxy!